
Shell Extension for Windows 32-bit and 64-bit with Delphi XE2 or XE3
Compile Delphi code for 64-bit platform is possible now with Delphi XE2 and XE3, developers can go beyond Windows 32-bit and start creating Windows Shell Extension for Windows 64-bit. Shell Extensions are in-process COM objects which extends the abilities of Windows OS. In this post I’m going to add two new context menu items in Windows Explorer. The menus will allow users to upload files to Microsoft Azure and Amazon S3. This post will go through how to create the extension, register and compile for 32-bit and 64-bit. I’m preparing another post, in which I will explain how to upload files to Amazon S3 and Microsoft Azure.
Creating the CloudUpload Shell Extension
In order to start creating a Shell Extension in Delphi, you first need to create an ActiveX Library project and after that create a new Automation Object. In the example I use for this post, the project name is CloudUpload and the Automation Object is called TCloudUploadContext. The TCloudUploadContext class must implement the interfaces IShellExtInit and IContextMenu in order to integrate the Context Menu in Windows Explorer.
    { IShellExtInit Methods }
    { Initialize the context menu if a files was selected}
    function IShellExtInit.Initialize = ShellExtInitialize;
    function ShellExtInitialize(pidlFolder: PItemIDList; lpdobj: IDataObject;
      hKeyProgID: HKEY): HResult; stdcall;

    { IContextMenu Methods }
    { Initializes the context menu and it decides which items appear in it,
      based on the flags you pass }
    function QueryContextMenu(Menu: HMENU; indexMenu, idCmdFirst, idCmdLast,
      uFlags: UINT): HResult; stdcall;

    { Execute the command, which will be the upload to Amazon or Azure}
    function InvokeCommand(var lpici: TCMInvokeCommandInfo): HResult; stdcall;
    { Set help string on the Explorer status bar when the menu item is selected }
    function GetCommandString(idCmd: UINT_PTR; uFlags: UINT; pwReserved: PUINT;
      pszName: LPSTR; cchMax: UINT): HResult; stdcall;
The ShellExtInitialize defines if the Context Menu will appear or not in Windows Explorer. In this sample the context menu only shows up if one file has been selected, otherwise no Context Menu. In case only one file was selected the FFileName variable will receive the name of the file.
function TCloudUploadContextMenu.ShellExtInitialize(pidlFolder: PItemIDList;
  lpdobj: IDataObject; hKeyProgID: HKEY): HResult;
var
  DataFormat: TFormatEtc;
  StrgMedium: TStgMedium;
  Buffer: array [0 .. MAX_PATH] of Char;
begin
  Result := E_FAIL;

  { Check if an object was defined }
  if lpdobj = nil then
    Exit;

  { Prepare to get information about the object }
  DataFormat.cfFormat := CF_HDROP;
  DataFormat.ptd := nil;
  DataFormat.dwAspect := DVASPECT_CONTENT;
  DataFormat.lindex := -1;
  DataFormat.tymed := TYMED_HGLOBAL;

  if lpdobj.GetData(DataFormat, StrgMedium) <> S_OK then
    Exit;

  { The implementation now support only one file }
  if DragQueryFile(StrgMedium.hGlobal, $FFFFFFFF, nil, 0) = 1 then
  begin
    SetLength(FFileName, MAX_PATH);
    DragQueryFile(StrgMedium.hGlobal, 0, @Buffer, SizeOf(Buffer));
    FFileName := Buffer;
    Result := NOERROR;
  end
  else
  begin
    // Don't show the Menu if more then one file was selected
    FFileName := EmptyStr;
    Result := E_FAIL;
  end;

  { http://msdn.microsoft.com/en-us/library/ms693491(v=vs.85).aspx }
  ReleaseStgMedium(StrgMedium);

end;
After the context menu handler is initialized via the IShellExtInit interface, Windows uses the IContextMenu interface to call the other methods of our context menu handler. In this case it will call QueryContextMenu, GetCommandString and InvokeCommand.
The Context Menu options (Amazon S3, Microsoft Azure) will be created through the QueryContextMenu method.
function TCloudUploadContextMenu.QueryContextMenu(Menu: HMENU;
  indexMenu, idCmdFirst, idCmdLast, uFlags: UINT): HResult;
var
  CloudMenuItem: TMenuItemInfo;
  MenuCaption: String;
  SubMenu: HMENU;
  uId: UINT;
begin
  { only adding one menu CloudMenuItem, so generate the result code accordingly }
  Result := MakeResult(SEVERITY_SUCCESS, 0, 3);

  { store the menu CloudMenuItem index }
  FMenuItemIndex := indexMenu;

  { specify what the menu says, depending on where it was spawned }
  if (uFlags = CMF_NORMAL) then // from the desktop
    MenuCaption := 'Send file from Desktop to the Cloud'
  else if (uFlags and CMF_VERBSONLY) = CMF_VERBSONLY then // from a shortcut
    MenuCaption := 'Send file from Shourtcut to the Cloud'
  else if (uFlags and CMF_EXPLORE) = CMF_EXPLORE then // from explorer
    MenuCaption := 'Send file from Explorer to the Cloud'
  else
    { fail for any other value }
    Result := E_FAIL;

  if Result <> E_FAIL then
  begin

    SubMenu := CreatePopupMenu;

    uId := idCmdFirst;
    InsertMenu(SubMenu, AmazonIndex, MF_BYPOSITION, uId, TClouds[AmazonIndex]);

    Inc(uId);
    InsertMenu(SubMenu, AzureIndex, MF_BYPOSITION, uId, TClouds[AzureIndex]);

    FillChar(CloudMenuItem, SizeOf(TMenuItemInfo), #0);
    CloudMenuItem.cbSize := SizeOf(TMenuItemInfo);
    CloudMenuItem.fMask := MIIM_SUBMENU or MIIM_STRING or MIIM_ID;
    CloudMenuItem.fType := MFT_STRING;
    CloudMenuItem.wID := FMenuItemIndex;
    CloudMenuItem.hSubMenu := SubMenu;
    CloudMenuItem.dwTypeData := PWideChar(MenuCaption);
    CloudMenuItem.cch := Length(MenuCaption);

    InsertMenuItem(Menu, indexMenu, True, CloudMenuItem);
  end;
end;
When you are in the Windows Explorer and you pass the mouse over one of the Cloud menu items a short help message is displayed in the Windows Explorer status bar, it is defined on the implementation of the method GetCommandString, which returns a string to the Windows Explorer to display.
function TCloudUploadContextMenu.GetCommandString(idCmd: UINT_PTR; uFlags: UINT;
  pwReserved: PUINT; pszName: LPSTR; cchMax: UINT): HResult;
begin
  Result := E_INVALIDARG;

  { Set help string on the Explorer status bar when the menu item is selected }
  if (idCmd in [AmazonIndex, AzureIndex]) and (uFlags = GCS_HELPTEXT) then
  begin
    StrLCopy(PWideChar(pszName), PWideChar('Copy the selected file to ' +
      TClouds[idCmd]), cchMax);
    Result := NOERROR;
  end;

end;
As the user clicks in one of the Cloud menu items, the method InvokeCommand will be called and start the process to upload the selected file to the Cloud selected. At this point we already have the file name and based on the lpici parameters we can identify what menu item the user clicked.
function TCloudUploadContextMenu.InvokeCommand(var lpici: TCMInvokeCommandInfo): HResult;
var
  Item: Word;
begin
  Result := E_FAIL;

  if HiWord(Integer(lpici.lpVerb)) <> 0 then
    Exit;

  { if the index matches the index for the menu, show the cloud options }
  Item := LoWord(Integer(lpici.lpVerb));

  if Item in [AmazonIndex, AzureIndex] then
  begin
    try
      Upload(lpici.HWND, Item, FFileName);
    except
      on E: Exception do
        MessageBox(lpici.hwnd, PWideChar(E.Message), 'Cloud Upload', MB_ICONERROR);

    end;
    Result := NOERROR;
  end;

end;
In order for the COM object to be created whenever the CloudUpload is loaded, it’s necessary to create an instance of a class factory that specifically creates an instance of the shell extension object, the factory instance will be created on the initialization section, based on the following code, which is a replacement for the default code created by Delphi.
initialization
  TCloudUploadObjectFactory.Create(ComServer, TCloudUploadContextMenu, CLASS_CloudUploadContextMenu, ciMultiInstance, tmApartment);
end.
Since the class factory will be responsible to register/unregister the DLL, the methods ApproveShellExtension and UpdateRegistry will be invoked, it will happen when you use the regsvr32.exe.
  { the new class factory }
  TCloudUploadObjectFactory = class(TAutoObjectFactory)
  protected
    procedure ApproveShellExtension(&Register: Boolean; const ClsID: string);
    function GetProgID: string; override;
  public
    procedure UpdateRegistry(Register: Boolean); override;
  end;

{ TCloudUploadObjectFactory }

{ Required to registration for Windows NT/2000 }
procedure TCloudUploadObjectFactory.ApproveShellExtension(&Register: Boolean;
  const ClsID: string);
Const
  WinNTRegKey =
    'SOFTWARE\Microsoft\Windows\CurrentVersion\Shell Extensions\Approved';
var
  Reg: TRegistry;
begin
  Reg := TRegistry.Create;

  try
    Reg.RootKey := HKEY_LOCAL_MACHINE;

    if not Reg.OpenKey(WinNTRegKey, True) then
      Exit;

    { register the extension appropriately }
    if &Register then
      Reg.WriteString(ClsID, Description)
    else
      Reg.DeleteValue(ClsID);
  finally
    Reg.Free;
  end;

end;

function TCloudUploadObjectFactory.GetProgID: string;
begin
  { ProgID not required for shell extensions }
  Result := '';
end;

procedure TCloudUploadObjectFactory.UpdateRegistry(Register: Boolean);
Const
  ContextKey = '*\shellex\ContextMenuHandlers\%s';
begin
  { perform normal registration }
  inherited UpdateRegistry(Register);

  { Registration required for Windows NT/2000 }
  ApproveShellExtension(Register, GUIDToString(ClassID));

  { if this server is being registered, register the required key/values
    to expose it to Explorer }
  if Register then
    CreateRegKey(Format(ContextKey, [ClassName]), '', GUIDToString(ClassID),
      HKEY_CLASSES_ROOT)
  else
    DeleteRegKey(Format(ContextKey, [ClassName]));

end;
Compile for 32-bit or 64-bit platform
At this point we just need to compile the extension, for this sample the Win APIs and RTL methods are the same for both platforms, we don’t need any specific code. You can define the target platform through the Project Manager, by default your project target 32-bit Windows, right click on Target Platforms to add 64-bit Windows.
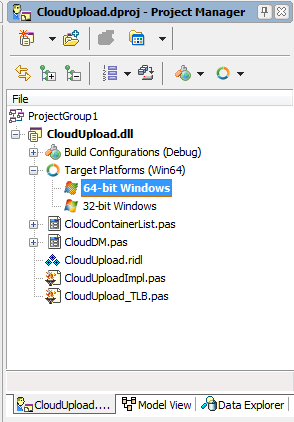
You can’t register 32-bit dll in 64-bit operation system, and you can not register 64-bit dll in 32-bit operation system. If you are using your develop machine to test, compile for the platform compatible with your OS.
Registering the CloudUpload Shell Extension
First, you must Run as Administrator the application you are going to use to register the shell extensions even if you are the Administrator user.
32-bit shell extensions can be registered through the IDE, and command line (cmd) can be used to register 32-bit and 64-bit.
Here the cmd line to register and unregister:
– Run as Administrator the cmd;
– Register the extension using the following command line: regsvr32 <PATH WHERE IS LOCATED THE DLL>CloudUpload.dll
– To unregister the extension using the following command line: regsvr32 <PATH WHERE IS LOCATED THE DLL>CloudUpload.dll /u
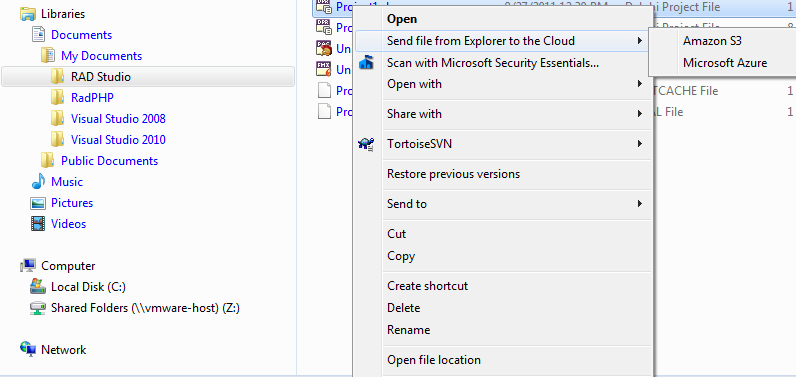
After register the DLL you can open the Windows Explorer, select one file and right click, you will see the new menu “Send file from Explorer to the Cloud”. The following screenshot show the shell extension on my Windows 7 64-bit.
You can download he source code in 2 different ways:
- Use the RAD Studio XE2 or XE3 IDE menu File option “Open from Version Control” and set the URL to https://radstudiodemos.svn.sourceforge.net/svnroot/radstudiodemos/branches/RadStudio_XE2/Delphi/CloudAPI/CloudUpload for XE2 and https://radstudiodemos.svn.sourceforge.net/svnroot/radstudiodemos/branches/RadStudio_XE3/Delphi/CloudAPI/CloudUpload for XE3
- Update your RAD Studio XE2 or XE3 local demo repository, in case you use TortoiseSVN just right click on the C:\Users\Public\Documents\RAD Studio\9.0\Samples\Delphi folder and select update;


How to create windows explorer extension for preview my own file format – similar to Jpeg or PNG?
Amazing, thanks 🙂
Thanks for this informative post.
I adapted this code for a shell extn that I wanted to appear in Win Explorer context menu for both files and folders. I found that with UpdateRegistry() shown here, it only appeared for files (tested on Win 7 64). To get it to appear for folders, I revised the code to repeat CreateRegKey (and DeleteRegKey) for key ‘Folder\shellex\ContextMenuHandlers\%s’. Hope that helps someone.
Andreano: the CSS is messed up for formatting the comments, hiding most/much of the comment text. Need to remove align right, and also fix the combo of 100% width and 50px padding-left, as that pushes rightmost 50px of text into hidden zone.
@Graham thanks for the feedback, just fixed the css.
Also I found the Subscribe checkbox wouldn’t work, probably overlayed. On FF 17.0.1
The source code download links are broken.