
 http://www.andreanolanusse.com/en/wp-content/uploads/2014/06/performance_benchmark-645x250.jpg
250
645
Andreano Lanusse
/images/BlogSlogan.png
Andreano Lanusse2014-06-09 00:27:362014-06-09 01:35:06Performance benchmark from Delphi 2010 to Delphi XE6
http://www.andreanolanusse.com/en/wp-content/uploads/2014/06/performance_benchmark-645x250.jpg
250
645
Andreano Lanusse
/images/BlogSlogan.png
Andreano Lanusse2014-06-09 00:27:362014-06-09 01:35:06Performance benchmark from Delphi 2010 to Delphi XE6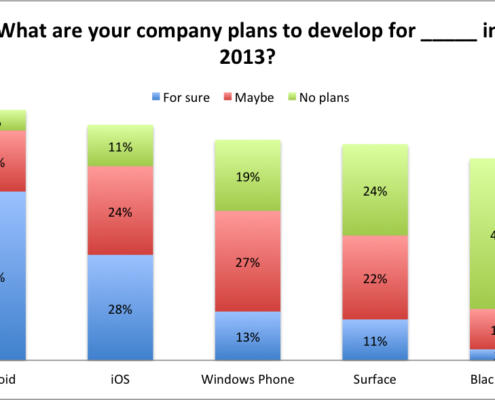 http://www.andreanolanusse.com/en/wp-content/uploads/2013/07/Survey-Mobile-2013.png
589
992
Andreano Lanusse
/images/BlogSlogan.png
Andreano Lanusse2013-07-13 17:27:052018-01-30 23:23:30Delphi Developers’ plan for mobile, desktop and n-tier development
http://www.andreanolanusse.com/en/wp-content/uploads/2013/07/Survey-Mobile-2013.png
589
992
Andreano Lanusse
/images/BlogSlogan.png
Andreano Lanusse2013-07-13 17:27:052018-01-30 23:23:30Delphi Developers’ plan for mobile, desktop and n-tier development http://www.andreanolanusse.com/en/wp-content/uploads/2013/06/OS-X-Mavericks.jpg
546
970
Andreano Lanusse
/images/BlogSlogan.png
Andreano Lanusse2013-06-11 07:53:422018-01-30 23:24:03Macs compatible with OS X Mavericks
http://www.andreanolanusse.com/en/wp-content/uploads/2013/06/OS-X-Mavericks.jpg
546
970
Andreano Lanusse
/images/BlogSlogan.png
Andreano Lanusse2013-06-11 07:53:422018-01-30 23:24:03Macs compatible with OS X Mavericks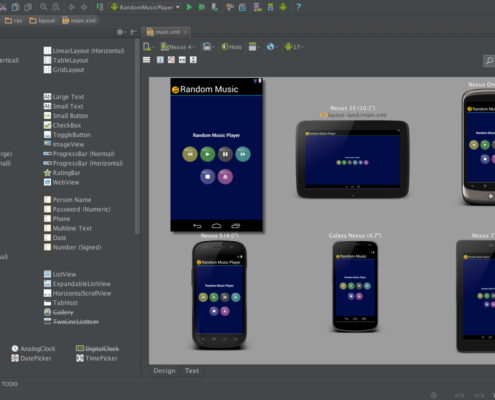 http://www.andreanolanusse.com/en/wp-content/uploads/2011/07/Android-Studio.png
800
1280
Andreano Lanusse
/images/BlogSlogan.png
Andreano Lanusse2013-05-22 23:14:032018-01-30 23:24:27Android Studio preview – The new Google IDE is out
http://www.andreanolanusse.com/en/wp-content/uploads/2011/07/Android-Studio.png
800
1280
Andreano Lanusse
/images/BlogSlogan.png
Andreano Lanusse2013-05-22 23:14:032018-01-30 23:24:27Android Studio preview – The new Google IDE is out